This section focuses on the installation of WDS.
Starting with ensuring the prerequisite requirements are met, we cover
installation on both Server 2003 (with SP1 or SP2) and then installing
WDS as a role for Windows Server 2008.
1. Satisfying prerequisites
There are a handful of requirements to consider
when installing WDS. Some require only that certain services be
available on the network and not necessarily on the local server where
WDS is being installed. WDS requirements include:
Active Directory Domain Services (AD DS):
The server to host WDS must either be a member of an AD DS domain or a
domain controller for an AD DS domain. The forest version does not
matter as all domain and forest configurations support WDS.
Dynamic Host Configuration Protocol (DHCP) Server:
While it does not need to be on the local server, you must have a
working DHCP server on the network because PXE relies on this for IP
addressing, which is used by WDS.
Domain Name System (DNS): Again, it need not be installed locally, but a DNS server is required on the network before you can run WDS.
NT File System (NTFS) Volume: The server must have at least one NTFS volume to the image store.
NOTE
When working with Windows Server 2003, RIS must be installed prior to installing WDS.
As you would expect, installation requires that
you are a member of the Local Administrators group on the server (of
which Domain Administrators will be a member when a member of a domain).
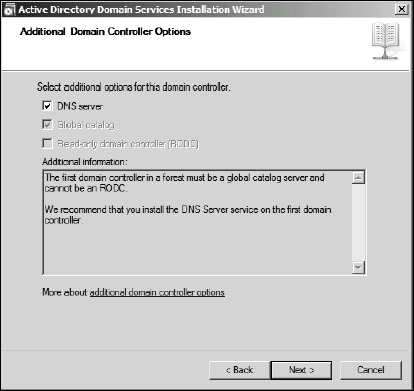
When adding Roles for Server 2008, the Add Roles
Wizard may be accessed from Server Manager. Here you may choose the
required services if needed. If setting up a new server for this purpose
it is important to note that you must install the AD DS role first,
then you can run the AD DS Installation Wizard (DCpromo.exe) to install AD DS and DNS Server together (shown in Figure 8.2). Once this process is complete you may then add DHCP.
NOTE
In a test lab, you may have all these
services on one server, but in a production environment you are likely
to have servers such as ADDS, DNS, and DHCP already established.
2. Setting up Windows Deployment Services for Server 2003
In addition to the prerequisites listed earlier,
when installing on Windows Server 2003 it is also necessary to have RIS
installed before you begin. It need not be configured, but it must be
installed. The steps that you need to take depend upon the service pack
level of your Windows Server 2003 system.
Installing WDS on Server 2003 with SP1
For systems with Service Pack 1, you must install RIS and then the WAIK before starting the installation of WDS.
Launch Add/Remove Programs from the control panel and click the Add/Remove Windows Components option on the left sidebar.
Select the option for Remote Installation Services and click the Next button to initiate the installation.
When the installation is complete, you may be prompted to reboot the server; do so and then continue to the next step.
Download the WAIK (approximately 1GB) from the Microsoft Web site (validation may be required).
www.microsoft.com/downloads/details.aspx?FamilyID=C7D4BC6D-
15F3-4284-9123-679830D629F2
After you have the download, you will notice it has
an IMG file extension. This is a DVD image file that you may burn using
your preferred software. It may be necessary to rename the file
extension from IMG to ISO in order for your software to properly
recognize the file. Alternatively, you can use a drive emulator, such as
Daemon Tools (www.daemon-tools.cc)
to mount the file as a drive without burning. Yet another option is to
make use of some tools such as WinRar or 7zip which support ISO files
just as you would any other archive file (like ZIP).
Run
the WDS installation from the WAIK DVD image titled
Windows-Deployment-Servies-Update-x86.exe (or -amd64 depending on your
system) located in the WDS folder (D:\WDS\Windows-Deployment-Servies-Update-x86.exe).
You
see a welcome screen and then a license agreement to accept as the
Software Update Installation Wizard begins. Simply click the Next button
to begin (there are no configuration options).
When the update is complete, you will be prompted to restart the server.
If you do not want to restart it now, be sure to select the Do not restart now check box before clicking the Finish button.
Installing WDS on Server 2003 with SP2
For systems with Service Pack 2, WDS is already
included. Steps here depend upon the status of RIS on the server at the
time the service pack was applied. Service Pack 2 contains the same
version of WDS that is available in the Windows AIK, so installation of
the Windows AIK is not necessary for installation of WDS (though you may
still want the tools for image management).
If you had RIS installed and configured at the
time Service Pack 2 was applied, the computer was automatically upgraded
to WDS (no further installations are needed).
If you had RIS installed but it was not
configured at the time Service Pack 2 was applied (or if you had not
previously had RIS installed on the server at all), you can install it
from Add/Remove Windows Components as described below:
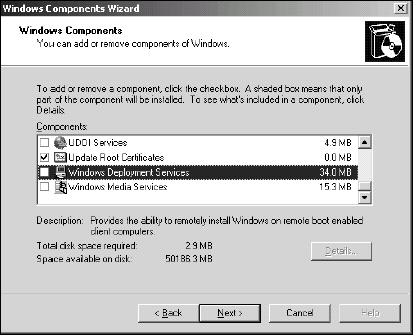
Launch Add/Remove Programs from the control panel and click the Add/Remove Windows Components option on the left sidebar.
Select the check box for Windows Deployment Services (as shown in
Figure 8.3) and press the Next button to initiate the installation.
Click the Finish button to close the installation wizard once the installation is complete. You will then be prompted to restart you server. When possible, restart the server to finalize the installation.